In today’s fast-paced digital age, managing emails can feel like a never-ending task. Our inboxes are constantly flooded with newsletters, promotional offers, and crucial communications, making the quest for “inbox zero” seem perpetually out of reach. Fortunately, smart home technology is stepping in to offer a helping hand. Amazon’s Alexa, the popular voice assistant, has evolved beyond simple commands and music playback to now assist with your email management. You might be wondering, Can Alexa Email Me? The answer is yes, and this article will guide you through exactly how to set up and utilize Alexa to check, read, and even respond to your emails, making your digital life a little more streamlined.
Setting Up Email on Alexa: A Step-by-Step Guide
Before you can start verbally commanding Alexa to handle your emails, you’ll need to link your email account to your Alexa app. The setup process is straightforward and will only take a few minutes. Here’s a detailed walkthrough:
Accessing Calendar & Email Settings in the Alexa App
-
Open the Alexa App: Launch the Alexa app on your smartphone or tablet. This is your central hub for managing your Alexa devices and settings.
-
Navigate to “More”: Look for the “More” option, typically located in the bottom navigation bar of the app. Tap on it to proceed.
-
Select “Settings”: Within the “More” menu, find and tap on “Settings”. This will take you to a comprehensive list of Alexa features and configurations.
-
Scroll and Choose “Calendar & Email”: Scroll down through the settings menu until you locate “Calendar & Email”. Select this option to manage your connected calendar and email accounts.
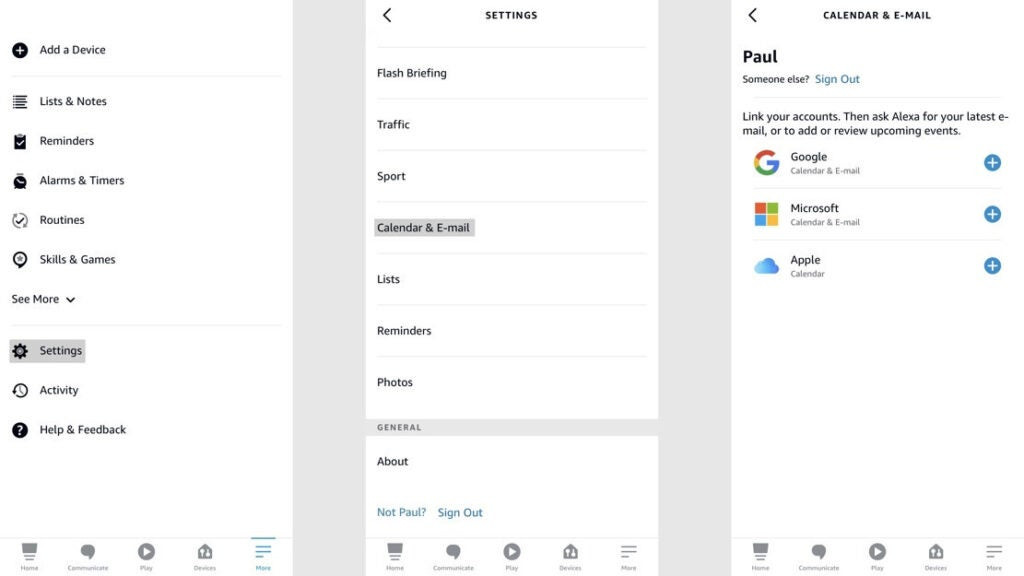 add email account to alexa
Connecting Your Google or Microsoft Account
Within the “Calendar & Email” settings, you’ll be presented with options to add or manage accounts.
- Choose Your Email Provider: Tap on “Add Account” if you are setting up an email account for the first time, or select an existing account if you’ve previously connected a calendar. You will see options for different providers. Currently, for email functionality, Alexa supports Google (Gmail) and Microsoft (Outlook, Hotmail) email accounts. While Apple is listed, it is only for calendar syncing at this time.
- Select Google or Microsoft: Choose either “Google” or “Microsoft” depending on your email provider.
- Enter Your Credentials: You will be redirected to a secure login page for your chosen provider. Enter your email address and password as prompted.
- Grant Permissions: You will be asked to grant Amazon permission to access your emails. It’s crucial to understand this permission. Amazon clarifies that this access is to enable Alexa to read and manage your emails upon your voice command and for security and compliance purposes. We will delve into privacy concerns in more detail later. Click “Allow” to proceed.
If you previously linked your Google or Microsoft account for calendar purposes, the process is slightly modified:
- Navigate to “Calendar & Email” in Settings.
- Select your existing Google or Microsoft account.
- Tap “Link email account” under “Email Settings”.
- Enter your credentials again to confirm email access.
Managing Email Signature and Security
Once your email account is linked, you’ll notice a new option within your account settings called “Signature”.
- Email Signature: Toggling this option “on” will append “Sent via Alexa” to any email you send using Alexa. This is similar to the default “Sent from my iPhone” signature and lets recipients know the email was dispatched through your voice assistant. You can choose to enable or disable this based on your preference.
- Email Security: For an added layer of privacy, Alexa offers an “Email Security” feature. Enabling this will require you to set up a four-digit voice code. Before Alexa performs any email-related actions, like reading or replying, it will prompt you for this voice code. This ensures that only authorized users can access your email through Alexa, adding a significant security measure.
Using Alexa to Read, Reply, and Manage Emails
With your email account successfully linked and security settings configured, you’re now ready to utilize Alexa for hands-free email management.
Reading Emails with Voice Commands
Initiating email access with Alexa is simple and voice-activated.
-
Wake Word and Command: Start by saying the Alexa wake word (typically “Alexa”), followed by commands like:
- “Alexa, read my email”
- “Alexa, check my email”
- “Alexa, what are my emails?”
-
Email Summary: Alexa will respond by providing a brief summary of your inbox. This includes the number of unread emails and whether any are marked as important.
-
Email Breakdown: Alexa will then proceed to read your emails aloud, one by one. For each email, it will announce the sender’s name and the subject line.
-
Action Prompts: After announcing the sender and subject, Alexa will present you with a range of voice-activated options:
- “Read”: To hear the full content of the email.
- “Reply”: To respond to the email.
- “Archive”: To archive the email.
- “Delete”: To delete the email.
- “Skip”: To move to the next email without taking action.
 How to use Alexa to check and respond to your email
Replying to Emails Hands-Free
Replying to emails using Alexa is convenient, especially when you are multitasking or your hands are occupied.
- Initiate Reply: After Alexa reads an email, say “Reply”.
- Dictate Your Response: Alexa will prompt you to dictate your reply. Speak clearly and naturally.
- Review and Send: Once you’ve finished dictating, Alexa will read your drafted response back to you for confirmation. You can then say “Send” to dispatch the email or “Cancel” to discard it and make edits if needed (though direct editing via voice isn’t currently a feature).
Email Management Options (Archive, Delete, Skip)
Alexa provides basic email management capabilities beyond just reading and replying.
- Archive: Saying “Archive” will move the current email to your archive folder, keeping your inbox clean.
- Delete: Saying “Delete” will move the email to your trash or deleted items folder.
- Skip: If you want to deal with an email later or simply move on to the next one, “Skip” is the command to use.
Limitations – No New Emails
It’s important to note a current limitation: Alexa can only reply to existing emails in your inbox. You cannot initiate a new email to a contact using Alexa. The functionality is centered around managing emails you’ve already received, not composing and sending new, outbound emails to arbitrary recipients.
Addressing Privacy Concerns When Linking Your Email to Alexa
Connecting your email to any third-party service naturally raises privacy questions. It’s essential to understand how Amazon handles your email data when you link it to Alexa.
Amazon’s Privacy Policy and Data Handling
Amazon acknowledges that when you link your email, your contacts and emails are stored in Amazon’s cloud. However, they emphasize several key points regarding data protection:
- Encryption: Your email information is encrypted both in transit and at rest on Amazon’s servers, adding a layer of security against unauthorized access.
- Secure Storage: Amazon states that your data is securely stored on their servers with robust security measures in place.
- Limited Access: Amazon explicitly states they only access and read your emails in specific situations:
- When you explicitly ask Alexa to read your emails. This is the primary purpose of the feature – to provide voice-activated email access at your command.
- For security and compliance needs. This is a standard clause for most online services and typically refers to investigating potential abuse, troubleshooting technical issues, or complying with legal requests.
Security Measures and Encryption
The use of encryption is a crucial security measure. Encryption transforms your data into an unreadable format, making it extremely difficult for unauthorized parties to intercept or access your email content. Amazon’s commitment to encryption provides a degree of assurance regarding data security.
Balancing Convenience and Privacy
Ultimately, the decision to link your email to Alexa involves weighing the convenience of voice-activated email management against potential privacy considerations. If you are comfortable with Amazon’s stated data handling practices and security measures, Alexa can be a valuable tool for managing your inbox hands-free. If you have heightened privacy concerns, especially with sensitive email content, you might choose to forgo linking your email account or utilize the email security voice code feature for enhanced control.
In conclusion, Alexa’s ability to read, reply, and manage your emails offers a significant step towards hands-free digital assistance. While it’s not a complete replacement for traditional email management, it provides a convenient and efficient way to stay on top of your inbox, especially when multitasking or seeking a break from screen-based interactions. By understanding the setup process, usage commands, and privacy considerations, you can make an informed decision about whether leveraging Alexa for email is the right choice for you.
